


How to Make a Kydex Sheath


If the paracord tutorials we’ve done on the Knife Blog haven’t been up your ally, then today’s your day because I’m going to teach you how to make a Kydex sheath with Spencer’s help. You’ve probably seen Spencer’s knife pimping skills on the blog before, and he’s no less skilled when it comes to making Kydex sheaths. The process really isn’t too challenging, so don’t be intimidated by the directions you see below. It might take a few words to explain everything, but I watched Spencer make a Kydex sheath from start to finish, and it’s really not as complicated as I thought it was going to be.
Spencer used some nice tools to make his sheath, but there are cheap alternatives to those tools you can use as well, which you’ll see listed below. Making a Kydex sheath takes approximately half an hour, and Spencer estimated that it costs about $5 to make one Kydex sheath (not including the tools you’ll need).
Equipment and Materials:
For this tutorial, we’re using an ESEE Candiru. The Candiru is a great option because it has a full tang and a skeletonized frame. You’ll see later on why this is beneficial. You can make a sheath for a folding knife too, but you’ll have to exercise a little more caution when you’re pressing the Kydex to make the sheath, but we’ll get to that later.
-Tape (we used the blue painter’s tape)
-Kydex sheets
You can typically get Kydex in a few sizes—the most common are .060, .080, and .093. The benefit of using the thinnest kydex is that it is the most flexible and will give you the most definition in your sheath. The thickest will hold the best, but you won’t get as much definition in your sheath with the thicker Kydex. We used the medium thickness for our sheath. Depending on the type of sheath you’re making, you’ll probably have enough Kydex to make more than one sheath.
-Toaster oven/oven/heat gun
-Non-contact thermometer
-Hydraulic press and foam or hinged pieces of wood with foam in the middle
-Drill press or hand drill
-Scroll saw, tin snips, or shears
-Rivet setter or hammer
-Rivets
-Sander or sand block
Types of Kydex Sheaths
Taco style:

the taco style uses a single piece of Kydex, folded over like a taco, to create a sheath.Some people like this type of sheath for neck knives, because it’s a little more compact than a pancake sheath and isn’t quite as bulky.
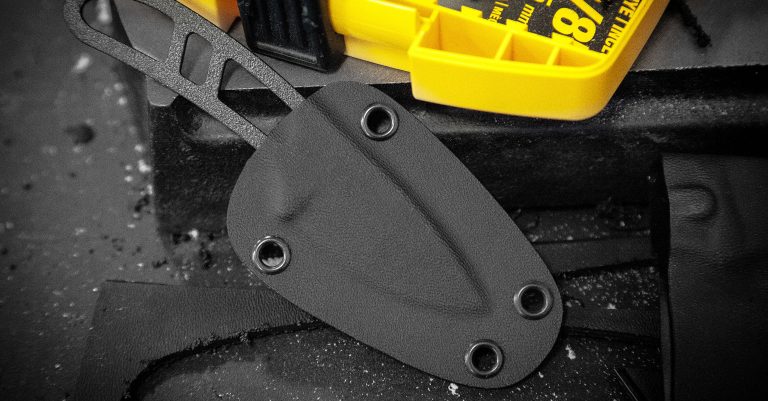
Pancake style: this style uses two pieces of Kydex, one on the front and one on the back, to make a sheath. Pancake-style sheaths are a little easier to make, so if this is your first time making a sheath, you might consider making a pancake sheath.
For this post, I’m going to focus on pancake style (pictured at the top of this page), but I’ll touch on taco-style sheaths briefly, too.
How to Make a Kydex Sheath
(As stated above, we used an ESEE Candiru for this tutorial)
1. Put two layers of tape on the blade so that you don’t end up making the sheath too tight. If the sheath is too tight, you can end up scratching the blade and removing the coating each time you replace or remove the sheath from your knife. Then, cut off any excess tape from around the blade, trimming as close to the blade as possible.
2. Cut out two squares of Kydex to the appropriate size, leaving ample room for error. Leaving a few inches on all sides of the blade should be plenty. Both pieces of Kydex should be the same size.
3. Preheat your oven to 330 degrees. Once it has pre-heated, place your Kydex side by side in the oven and wait for the sheets to get up to 330 degrees (it probably takes 5–10 minutes). This is a great time to bust out the non-touch thermometer; use it to keep track of the temperature of the Kydex sheets, and once they get up to 310°–330°, you can take them out of the oven. Then, quickly move the sheets over to your hydraulic press.
(If you are using a heat gun, just slowly wave the gun over the Kydex until it gets up to temperature. For those without a non-touch thermometer, you can tell that the Kydex is ready once it is pliable like leather.)
4. Once you’ve got the Kydex on the hydraulic press, you’ve got to move fast because the longer you wait to press the Kydex, the less definition you’ll get in your sheath. Spencer put thick foam both underneath and on top of the Kydex in the press. Place one sheet of Kydex on the press, place your blade in the middle of the sheet, and put the second sheet of Kydex directly on top. Then use the hydraulic press to press down on the Kydex and blade.


(For a taco sheath: do the same thing, but put the Kydex on the press, place the blade on the Kydex, and fold the Kydex over the knife so that the crease very closely follows the spine of the blade.)
It’s difficult to explain how hard you need to press the Kydex. Unfortunately it’s more of a learn-as-you-go type of thing, so you might have to try it a few times before you get the hang of it. (If you mess up and aren’t happy with the results, you can always put the Kydex back in the oven and it should go back to being flat and flexible again.)
Leave the Kydex in the hydraulic press for about 5–10 minutes. When you take it out, the Kydex can still be a little flexible, but it shouldn’t be hot anymore.
5. If you’re going to do rivets, now’s the time to do them. Figure out where you want the holes to be, but make sure they aren’t too close to the blade, but also make sure they’re not too far away. You can use a drill press or a hand drill to make the rivet holes. Once that’s done, put one rivet in one side of the sheath and one more on the opposite side just to hold everything together for the next step.

6. Remove the knife from the sheath. Using a scroll saw (or tin snips or shears), get your Kydex sheath down to its semi-final shape. If this is the first time you’ve done this, make sure to leave yourself a little room to work with.


7. Now, you can shape it down to its final shape using a sander or a sanding block while also smoothing out the rough edges of the sheath.
8. Take out the rivets and wipe out the inside of the sheath to make sure it’s clean. Then, put all of the rivets in using a rivet setter if you’ve got one, or a hammer. Now you’re done!
If you have any questions about how to make a Kydex sheath, please let us know in the comments section below!
If you are looking for a good knife or some paracord to go with that new Kydex sheath, be sure to head over to Blade HQ!


 Copyright © 2026 Blade HQ. All rights reserved
.webp)